Study Configuration is where various study settings are defined. This is where the following are controlled:
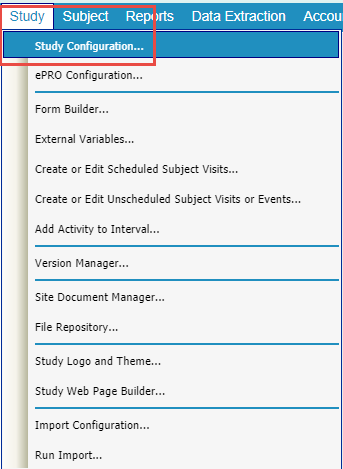
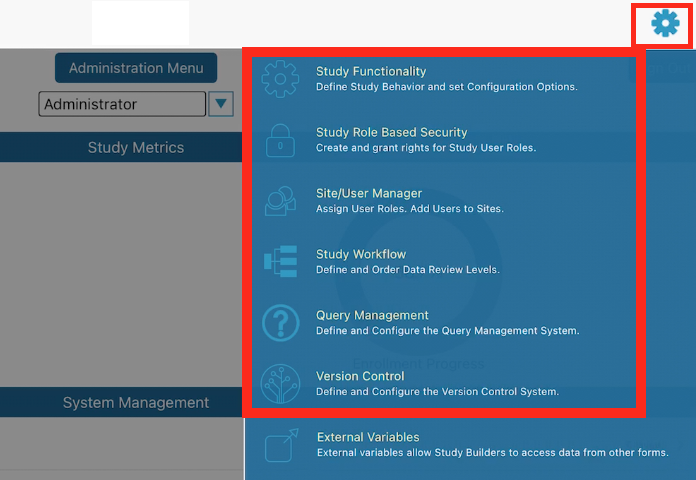
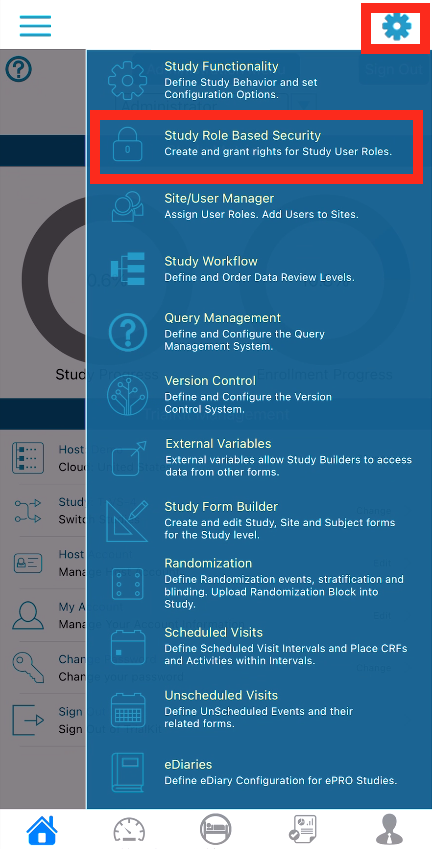
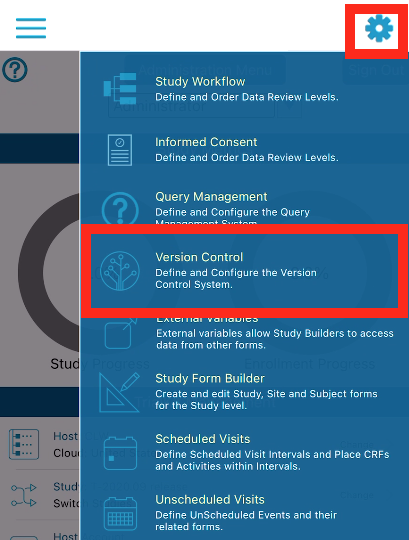
To access the Study Configuration settings on the web, navigate to the Study menu. In the app, select the Settings gear icon.
Study Functionality
Functionality settings are a way of enabling basic functions in a study. Not all studies require many functions, so they can be disabled to prevent the system from running those functions.
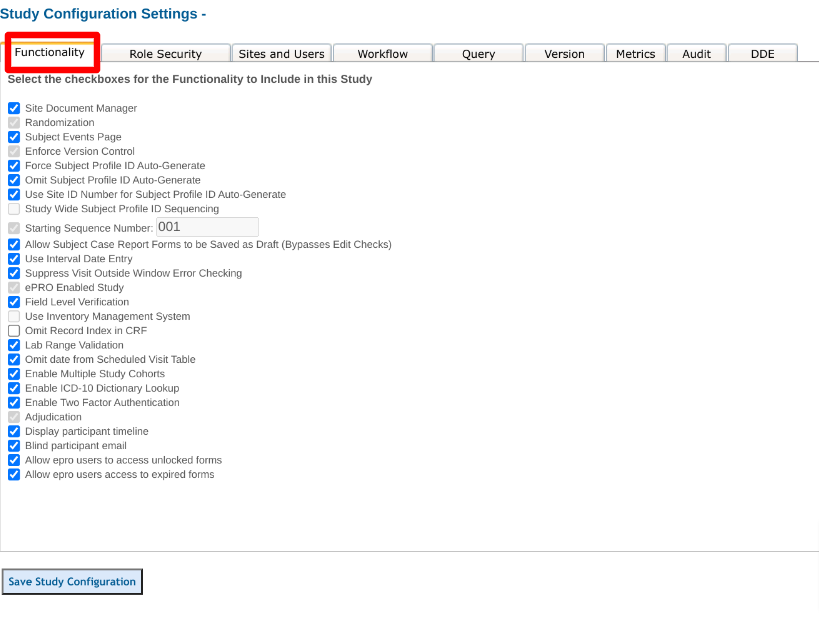
On the web:
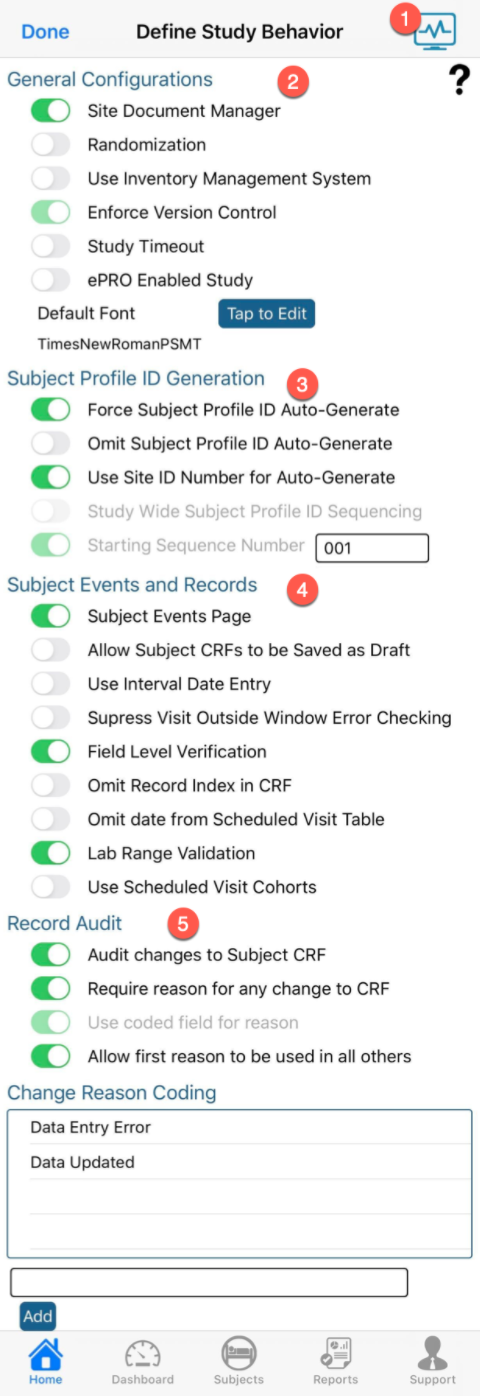
On the app:
Study Status
This controls data entry within Provider sites.
General Configurations
Site Document Manager - All Studies will have this enabled regardless of this option being checked.
Randomization
Must be selected if you plan to randomize subjects in the study.
Use Inventory Management System
This enables inventory-related functions if products will be dispensed or tracked in conjunction with the study.
Enforce Version Control*
This enables study versioning and is used in most studies as it allows for making controlled post-production changes to the study or form design. This option cannot be changed after data is entered into the study.
Subject Events Page
This is enabled in most studies as it allows access to a subject's records. Occasionally studies are simple enough where scheduled visits and other forms are not required. In these cases, a single form can be managed from the subject enrollment table alone.
Study Timeout
Enforced only on mobile. This causes the user's session to timeout from inactivity. Note, that mobile app operating systems will always cause the app to sign out when it is stopped in memory, regardless of this setting.
Enable two-factor authentication
This forces all users in the study to use two-factor authentication. The system emails verification to the email address of the user anytime they sign in on a new device.
ePRO Enabled Study
This enables a new column in the subject enrollment table with a link to each subject's ePRO sign-in information.
Grouped Scheduled Visits
This replaces a standard visit schedule with a Grouped Visit model.
Adjudication
Enables the adjudication function for the study
Display Participant timeline
For ePRO studies, this Provides a visual timeline chart on the Participant’s home screen
Blind Participant Email Address
This blinds the email address of participant users in the Sign In Audit, the Host’s User Manager, and the Study Site/User Manager
Default Font
This is used within the mobile app form builder. When creating new labels on forms, this default font will be used.
Subject Profile ID
Force Subject Profile ID Auto-Generate
Forces users to use a link on the subject enrollment table for the system to automatically generate a profile ID for a newly enrolled subject. If this option is not checked, the auto-generated link may still be available, but the system will also allow the user to manually change or enter a profile ID.
Omit Subject Profile ID Auto-Generate
Removes the auto-generated link option from the subject enrollment table. Users will need to manually enter a profile ID for new subjects.
Use Site ID Number for Subject Profile ID Auto-Generate
Uses the site ID number from the Site Manager as part of auto-generated subject profile IDs. To force this on new subjects, option 5 above must be enabled along with this option.
Study Wide Subject Profile ID Sequencing*
When auto-generation of profile ID is used, with this option enabled, the system will sequence subject profile IDs across all sites of the study. With this option not checked, the system will default to sequencing subject IDs independently within each site.
Starting Sequence Number*
When auto-generation of profile ID is used, the system will begin with the "0001" unless another format such as "001" is specified herein which case the first subject generated would be "001".
Subject Events and Records
Subject Events Page
This is normally enabled. It allows for tapping a subject to open the casebook of other forms. If the study only collects a registration form, this could be disabled to simplify it for study users.
Allow Subject Forms to be saved as Draft
This places an option on each form to “save as a draft”. This option will allow users to save data entered on forms without the system running any edit checks or firing unnecessary queries on forms before they are finished completing it.
Draft saving does not track the "DATA CHANGES" in form if data is changed. Only saving data as final will start the "Data Changes" audit and you may be prompted to input a reason for data change per 21 CFR Part 11 guidelines. The form will show as "Record Saved as Draft" in the audit trail and simply update each save of form in that draft state.
Use Interval Date Entry
Allows for dates to be entered on scheduled visit intervals so users do not need to enter a date on every form within the intervals. If this option is enabled, the individual forms must also be configured for Interval date entry in the Form Builder.
Suppress Visit Outside Window Error Checking
Forces the system to NOT check the dates entered on scheduled visits as being within their scheduled window. This option is normally left unchecked as forms can individually be configured to suppress VOW error checking in the Form Builder.
Field Level Verification
Field level source verification (risk-based monitoring) is set up in the study Workflow and the Form Builder. This option will not affect study behavior.
Omit Record Index
This will disable a link built into forms that allow users to view the list of forms collected for the current subject without needing to leave the form they are currently working on and allows them to arrow forward/backward to the next form in sequence order by DATE of the form if entered. A warning message is there to remind you to save data to prevent data entry loss. NOTE: This feature is omitted (checked) by default to greatly speed up how fast forms load on web browsers.
Lab Range Validation
Enables the study to use site-specific lab range checks.
Omit date from scheduled visit table
Hides the date windows and target date that are normally displayed in the scheduled visit grid within a subject's records. Note, that all date calculations are still happening in the background - including missed visits or forms that are entered outside the allowed window. (New)
Use ICD-10 Dictionary
Enables an ICD-10 Lookup button on the top of all eCRFs for users to reference ICD-10 diagnosis and procedure codes/terms
Enable Study Cohorts
Enables functionality to add multiple cohorts within the visit schedule set up and adds a new column in the subject manager to see which cohort each subject is currently on.
Allow ePRO Users Access to Unlocked Forms
For ePRO studies, this adds a new option on the Participants' home screen to access previously entered forms that are not review locked. If participants update existing records from the list, the visit date on the form will not be updated.
Allow ePRO Users Access to Expired Forms
For ePRO studies, this adds a new option on the Participants' home screen to access missing forms. These are ePRO forms collected within a visit schedule where the windows have expired.
Default to Single Interval Page
When users open a subject to view records, the system default view is the full visit schedule grid. This setting makes it so only one visit at a time can be viewed. This is helpful for large visit schedules to prevent slowness of page loading every time a user opens a subject
Audit changes to CRF
This causes the system to track events that occur on forms
Require reason for any change to CRF
This forces users to provide a reason after making changes to existing (previously saved) data. This must be enabled for full change audit tracking.
Use coded field for the reason
This provides the users preset reasons for changing data (defined below)
Allow first reason to be used on all others
This adds convenience for users to quickly apply one reason to all other changes that occurred in that same save event. Otherwise, the user must individually provide a reason separately for every change.
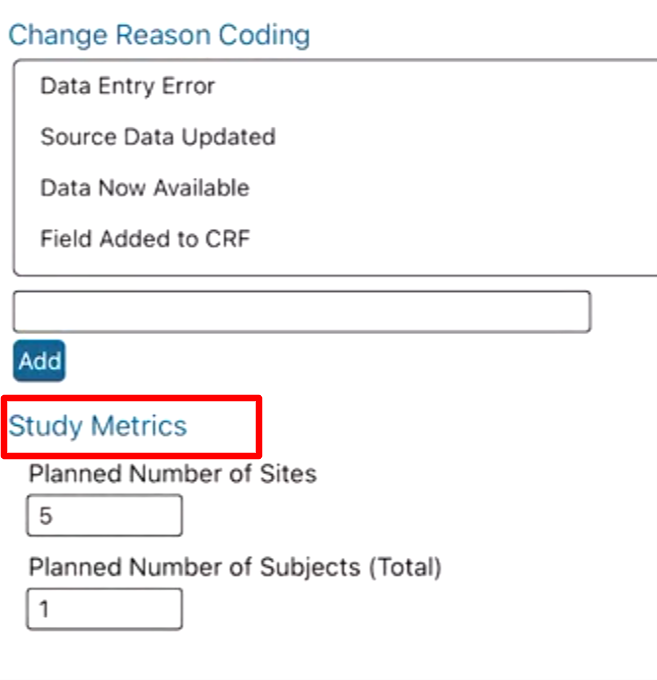
Change reason coding
Configure the reasons users can provide for changing data.
*cannot be changed after subjects exist in the study, even if they are test subjects. To start with a clean study, either create a new study (copy) or clear all subject data.
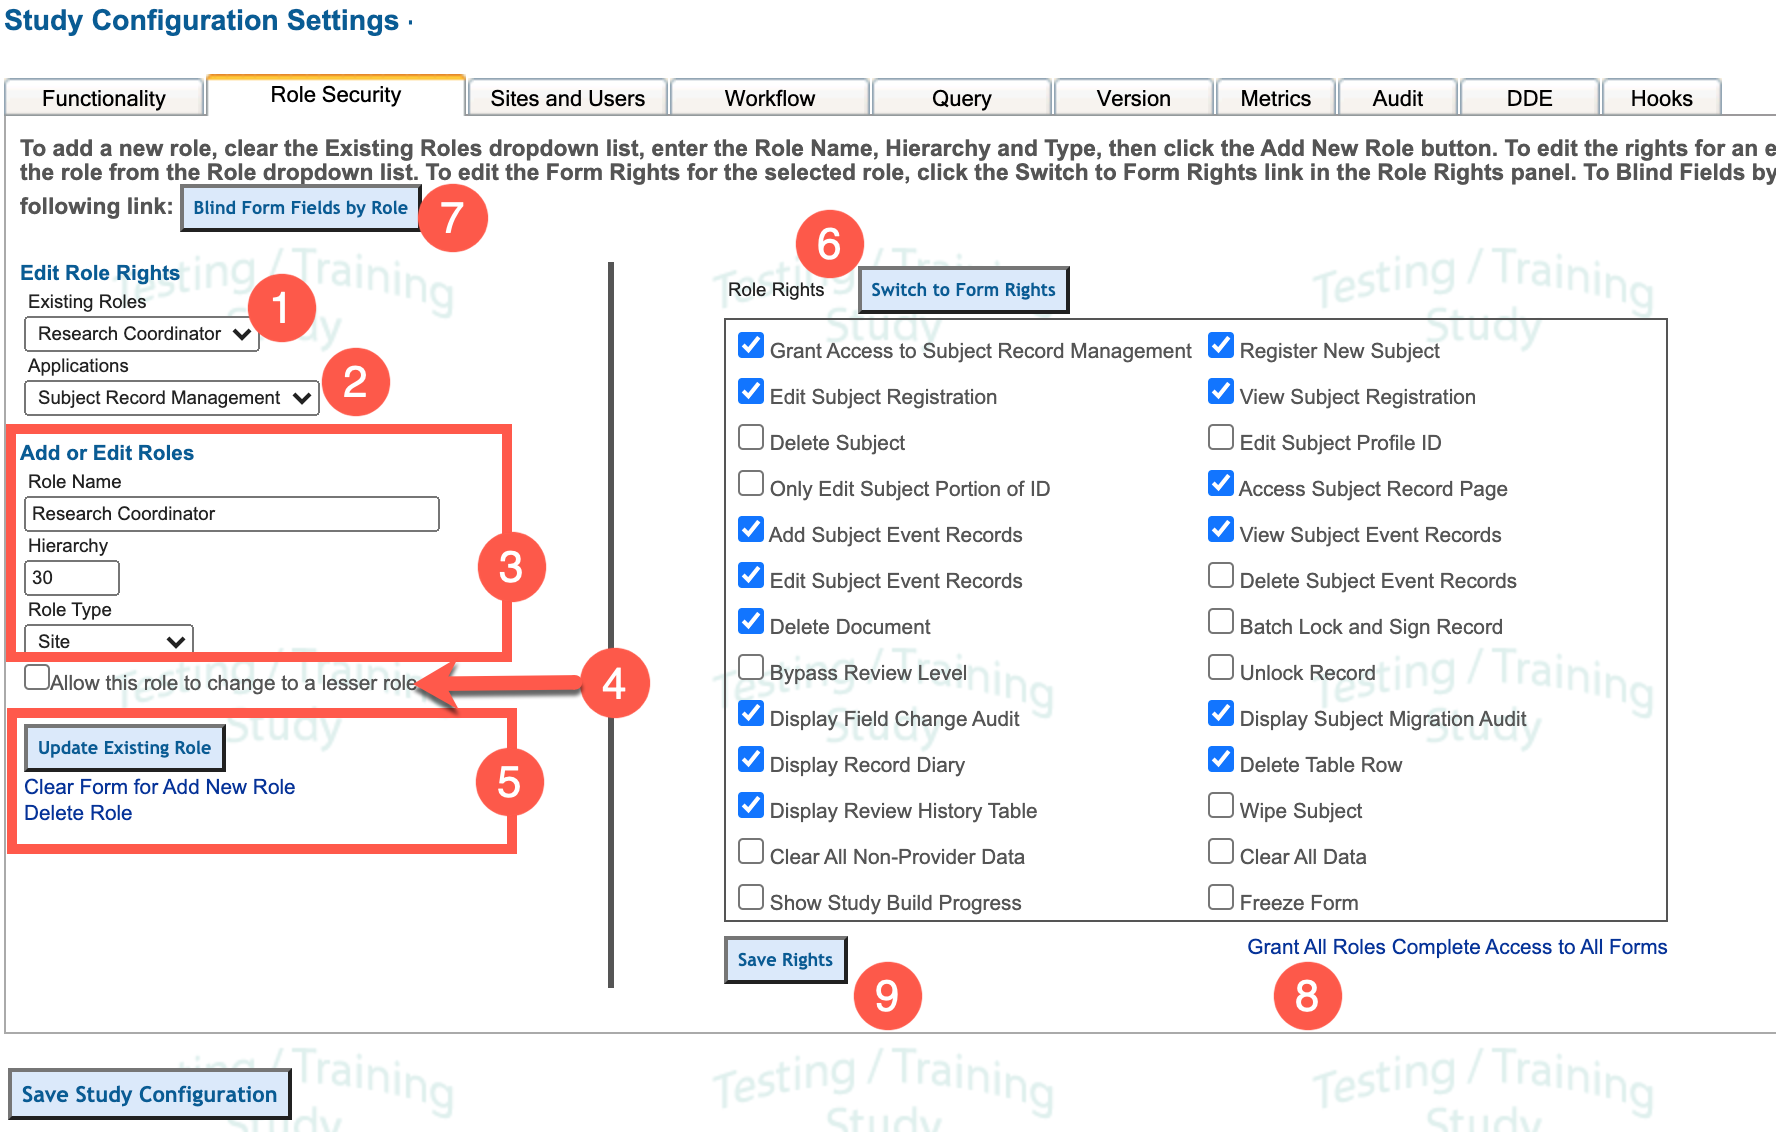
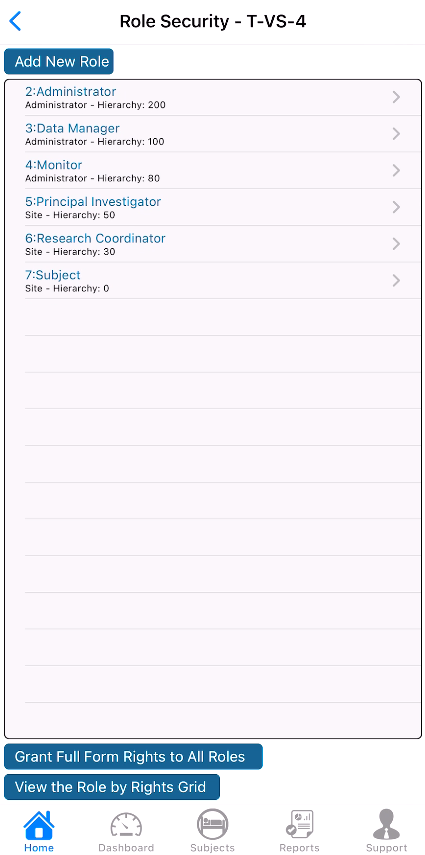
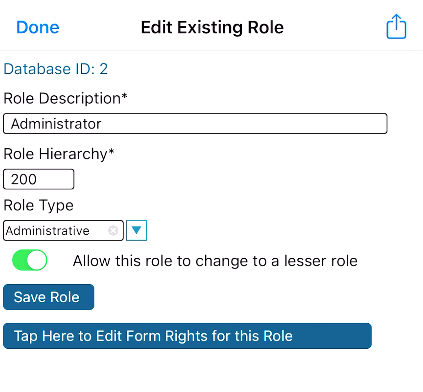
Role Security
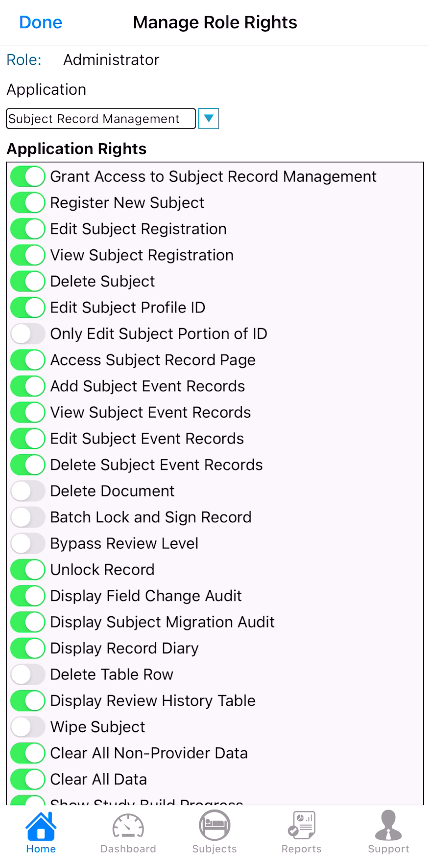
User roles and study permissions (access to various functions) are all managed within the role security settings described here.
Please read the Study Permissions Guide for the list of all permissions and their definitions.
Assigning Users to Roles and Sites
Select the Sites & Users tab (web), or the Site/User Manager (on the app) as noted below in the expandable sections.
Adding users to a study
Adding sites to a study
All changes made on sites and users will be traceable in the Site/User Audit Report.
For a comprehensive report displaying all users, which sites they belong to, and which roles they have in the study, see the Site by User Report under the Reports menu.
Study Workflow
On a web browser:
Select Study Configuration from the study menu, and select the Workflow tab highlighted in the image.
Order - Set review order of roles. Be sure these are sequential and not skipping values
Name - Name of review level set up
Role - Role of the reviewer to the system
Status - This must be a value between 10 and 19. Every record in the system has a status based on its current state. The value defined here will be what the database stores as a value for any record reviewed at the corresponding level. This value can display in the data exports and/or the report builder.
For the Status value, once this is set and records contain that status, its important that this does not get changed. Doing so will change what each record status in the study means.
Field - Checking this field will allow the role the ability to do Partial Monitoring of forms. For setting up forms to support field-level (FLSV) monitoring, read here.
Sign - Checking this field requires Electronic Signature for this role review to be completed.
Soft - Can only be selected at the first review level, and should not be mixed with FLSV (field) level review.
This allows the first level to mark something as reviewed regardless of the form's current status (open queries or missing data). This is useful for Monitors who perform monitoring before forms are completed. If data is changed after a soft review has been applied, the review level will be removed on that form only if there are open queries on the form.
Description - Review level description text that will appear on the form when applied.
The bottom section of the Workflow is where users define basic forms for the system to use in controlling various elements.
Delete - A red 'X' will appear next to any level where data has not yet been reviewed at that level. Once data exists there, the status/level cannot be removed. Additionally, workflow levels cannot be deleted if the study is set to “Live” status.
Definition of Key Forms and Variables
Registration form - The form from the form builder that will serve as the initial enrollment or registration form to create a new subject profile ID. This item will be grayed out and cannot be changed if there are subjects in the database. In those cases, clear the data or create a new copy of the study to change the registration form.
The visit date on this form is also what is used to:
Compute the starting point for the visit schedule
Display the “Registration Date” on the information panel of the subject’s casebook screen
Enrollment Trigger - This is the form and corresponding variable (boolean) and value which will count each subject as "enrolled" in the study. This may be the same as registration in many cases, but may also be some date later on. For example, screening subjects (registration) and later on enrolling them upon randomization (enrollment).
This variable is used in:
The dashboard for the number of subjects
TrialKit Drive Site Progress Data
The visit date defined on this form is displayed as the “Starting Date” on the information panel of the subject’s casebook screen
Deviation form - Indicate which form will serve as a deviation form. These are counted in the dashboard report
Study Exit form - Indicate which form will determine the end of each subject’s study involvement (e.g. study exit or discontinuation). The system uses the date on this form to make any visits beyond that date inaccessible to the site. It also stops any ePRO forms from being deployed to the Participant.
A description (Study Exit ‘Reason’) field can also be identified which is displayed on the subject's casebook screen.
If a field is not defined, the system will use a generic message: “Subject has exited from the study”
Medication log - Indicate which form will serve as the medication log.
Adverse Event form - Indicate which form will serve as the adverse event form. This is counted in the Dashboard Report AE metric
Adverse Event Field - This is the field (must be a choice field) you want the system to use specifically when counting the number of AEs in various reports. If this is not set, it will default to simply using the form defined above.
Adverse Event Value - This is the value of the Adverse Event Field selected above that will true a "true" response - or a count in this case.
Query Settings
The Query settings with study configuration allow for defining the following factors:
Email Notifications for queries
The system can e-mail relevant users with new queries or query responses. Remember the author of the query leaves a query message and the recipient(s) leaves a query response. Depending on how you set this up, notifications can be sent to both author and recipient or turned off completely. The following explains each setting.
Send Notification E-Mail for Each New Query
Each time a query is generated, regardless of whether it is manual or automatic, a notification e-mail can be generated and sent to all or some of the relevant parties. This works in conjunction with the other settings.
Send Notification E-Mail for Each Query Message
Each query will have a series of messages. Messages can either be sent from the author or recipients. These messages form a query dialog. Each time a message is added to the query, a notification email can be sent to all or some of the relevant parties. This works in conjunction with the other settings.
Do Not Send E-Mail Notifications to the Site
If you are concerned about spamming your Site, you can check this setting so email notifications will not be sent to the Site. Remember the My Queries report will report all open queries and allow users to access the entire query dialog. Therefore, it is often not necessary to send query notifications to site users.
Only Send E-Mail Notifications for Manual Queries
This sends notifications to all users who are part of the distribution for the query which triggers the notification. All queries and their dialog is available in the Queries Report, which is why you may only want to send out notifications when queries are generated manually by a user such as a Monitor.
Query Coding
Query coding is an important function of the Query Management System. Query codes allow for standardizing queries based on the reasons for the query. There are 4 types of query codes, they include:
Interval Queries
Visit/Event Queries (form level)
Field Queries; and
Close Query Reasons
When a query is created or closed manually, it provides the user with a list of possible reasons for creating or closing the query.
Below is the study configuration setting for Field Choices in the Query Tab.
The figure below shows the Query Window for a user with Create New Query rights.
Notice how the code entered into the Study Configuration Settings application, populates the corresponding query type list box when creating a new query from the screenshot above on Field Queries.
Default Query Deployment roles
When queries are created, they are deployed to specific user roles at the corresponding site. Those roles are set in this section. When a user creates a manual query, they also have the option of changing these default roles, so only the necessary users can access the query.
If specific edit checks should only deploy queries to specific roles, these default settings can be overridden on a per-query basis.
Version Settings
TrialKit has a powerful feature for Versioning to make compliant and controlled changes to studies without needing to pause the study. Study subjects can run on multiple versions in parallel. For example, subjects who have already withdrawn from a study would not need to have study design changes applied to their data, so they could remain on a prior version, while the active subjects are migrated to a newer version.
Versioning is enabled by default but can be manually enabled/disabled within the study functionality settings.
Managing Versions
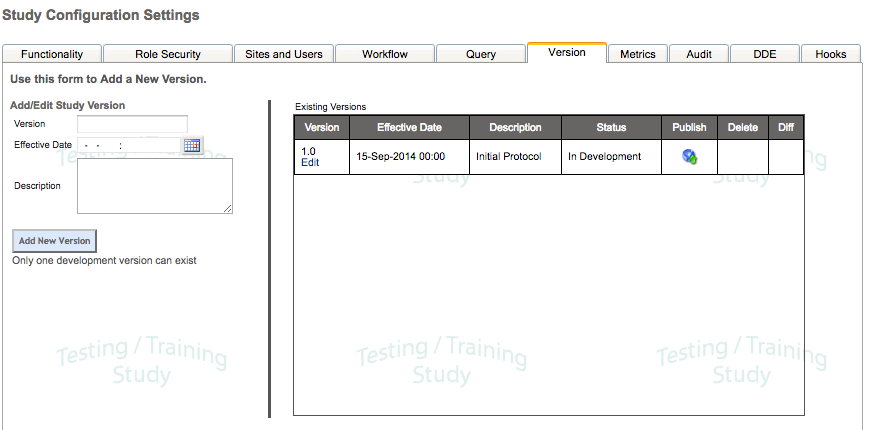
If enabled, new versions can be created within the study settings:
Ensure that the dates of versions are sequential to one another. If the effective date of version 2 is equal to or prior to the effective date of version 1, migrating subjects from version 1 to 2 will not work.
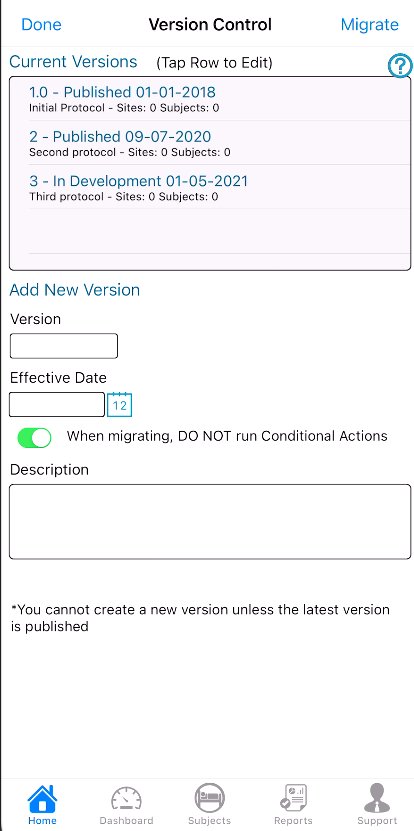
Version Migrations
The Version Manager screen is used to control which sites and subjects are part of specific study versions. This is also where subjects are migrated from older study versions to newer ones as changes are made to the study design.
The Dashboard Report
The mobile app home screen progress charts
The Metrics section within the study configuration allows for setting the total number of sites and subjects planned for enrollment.
On the mobile app, its found at the bottom of the study functionality screen:
Audit Settings
The audit settings dictate how the system tracks changes to study data. To access it, open the Study Configuration page and select the Audit tab. Read below the image for a description of each setting.
Audit Changes to Subject CRF data
- This tells the system to track data changes on all subject forms.
- When data is changed on an existing subject record, the system will ask the user to provide a reason for changing the data. These reasons can be pre-set and required, as explained in the next few options.
Use coded instead of the free text field for the reason
- If this is checked, when reasons are provided for changing data, it will force the user to use the pre-set options. This makes data management a little easier.
Allow first reason to be inserted for all other reasons
- If several data changes are made on the same record, this option allows (but does not force) the user to enter the same reason for all the changes with one click, rather than going through and providing a reason for each individual field.
- Allows the study designer to provide pre-set reasons for changing data. This may be forced on users or it can be made optional (see #3 above).
Changes cannot be made to these options after subjects exist in the study. If you are merely testing your study with test subjects, either clear all data from the Study Configuration page, or copy the study to start new.
With these audit functions, all enabled, the system will audit changes to the Subject case report forms and report on those changes in the Form Audit Table shown on each eCRF (permission-dependent).
For Administrators, the audit trail for data entry can be seen globally via the Record Transaction Audit and the Data Change Audit reports. These display all events and changes in all forms in the study.
Related articles
